How To Set Up SSH To Raspberry Pi Behind Firewall Port Forwarding: A Complete Guide
Accessing your Raspberry Pi remotely can unlock a world of possibilities, whether you're managing IoT devices, running a home server, or experimenting with coding projects. However, when your Raspberry Pi sits behind a firewall or router, setting up secure shell (SSH) access can seem daunting. With the right steps, you can configure SSH to Raspberry Pi behind firewall port forwarding, ensuring secure and seamless remote access. This guide will walk you through the entire process, from understanding the basics to troubleshooting common issues. By the end, you'll have a clear roadmap to set up your Raspberry Pi for remote access, even in restrictive network environments.
SSH (Secure Shell) is a protocol that allows secure communication between two devices over an unsecured network. When your Raspberry Pi is behind a firewall or NAT (Network Address Translation), you need to configure port forwarding to route external traffic to your device. This ensures that your Raspberry Pi can communicate with the outside world without exposing it to unnecessary risks. With the rise of smart homes and IoT devices, mastering this setup is becoming increasingly valuable for tech enthusiasts and professionals alike.
While the process might seem technical at first, breaking it down into manageable steps makes it accessible even for beginners. Whether you're a hobbyist or a professional, understanding how to set up SSH to Raspberry Pi behind firewall port forwarding is a skill that can enhance your projects and simplify remote management. In this article, we'll explore everything you need to know, from the tools required to advanced configurations, ensuring you can confidently navigate the process.
Read also:Discover The Inspiring Journey Of Brandon Biggs Ministry Faith Leadership And Community Impact
Table of Contents
- What Is SSH and Why Is It Important?
- How Does Firewall and Port Forwarding Affect SSH?
- Step-by-Step Guide to Configure SSH on Raspberry Pi
- What Are the Common Challenges with SSH and How to Overcome Them?
- Is It Possible to Secure SSH Connections Further?
- How Can You Test Your SSH Connection?
- What Are the Alternatives to Port Forwarding for SSH?
- Frequently Asked Questions
What Is SSH and Why Is It Important?
SSH, or Secure Shell, is a cryptographic network protocol used to securely access and manage devices over an unsecured network. It provides a secure channel for executing commands, transferring files, and managing configurations remotely. This makes SSH an essential tool for anyone working with networked devices like Raspberry Pi. By encrypting data during transmission, SSH ensures that sensitive information, such as login credentials, remains protected from unauthorized access.
For Raspberry Pi users, SSH is particularly valuable because it allows you to control your device without needing physical access. Whether you're troubleshooting issues, deploying updates, or running scripts, SSH provides a reliable and efficient way to interact with your Pi. Additionally, SSH supports key-based authentication, which enhances security by eliminating the need for passwords. This feature is especially important when your Raspberry Pi is exposed to the internet through port forwarding.
Understanding SSH is the first step toward mastering remote access. It not only simplifies device management but also lays the foundation for more advanced configurations. As we delve deeper into this article, you'll see how SSH integrates with firewall and port forwarding settings to create a robust remote access solution.
How Does Firewall and Port Forwarding Affect SSH?
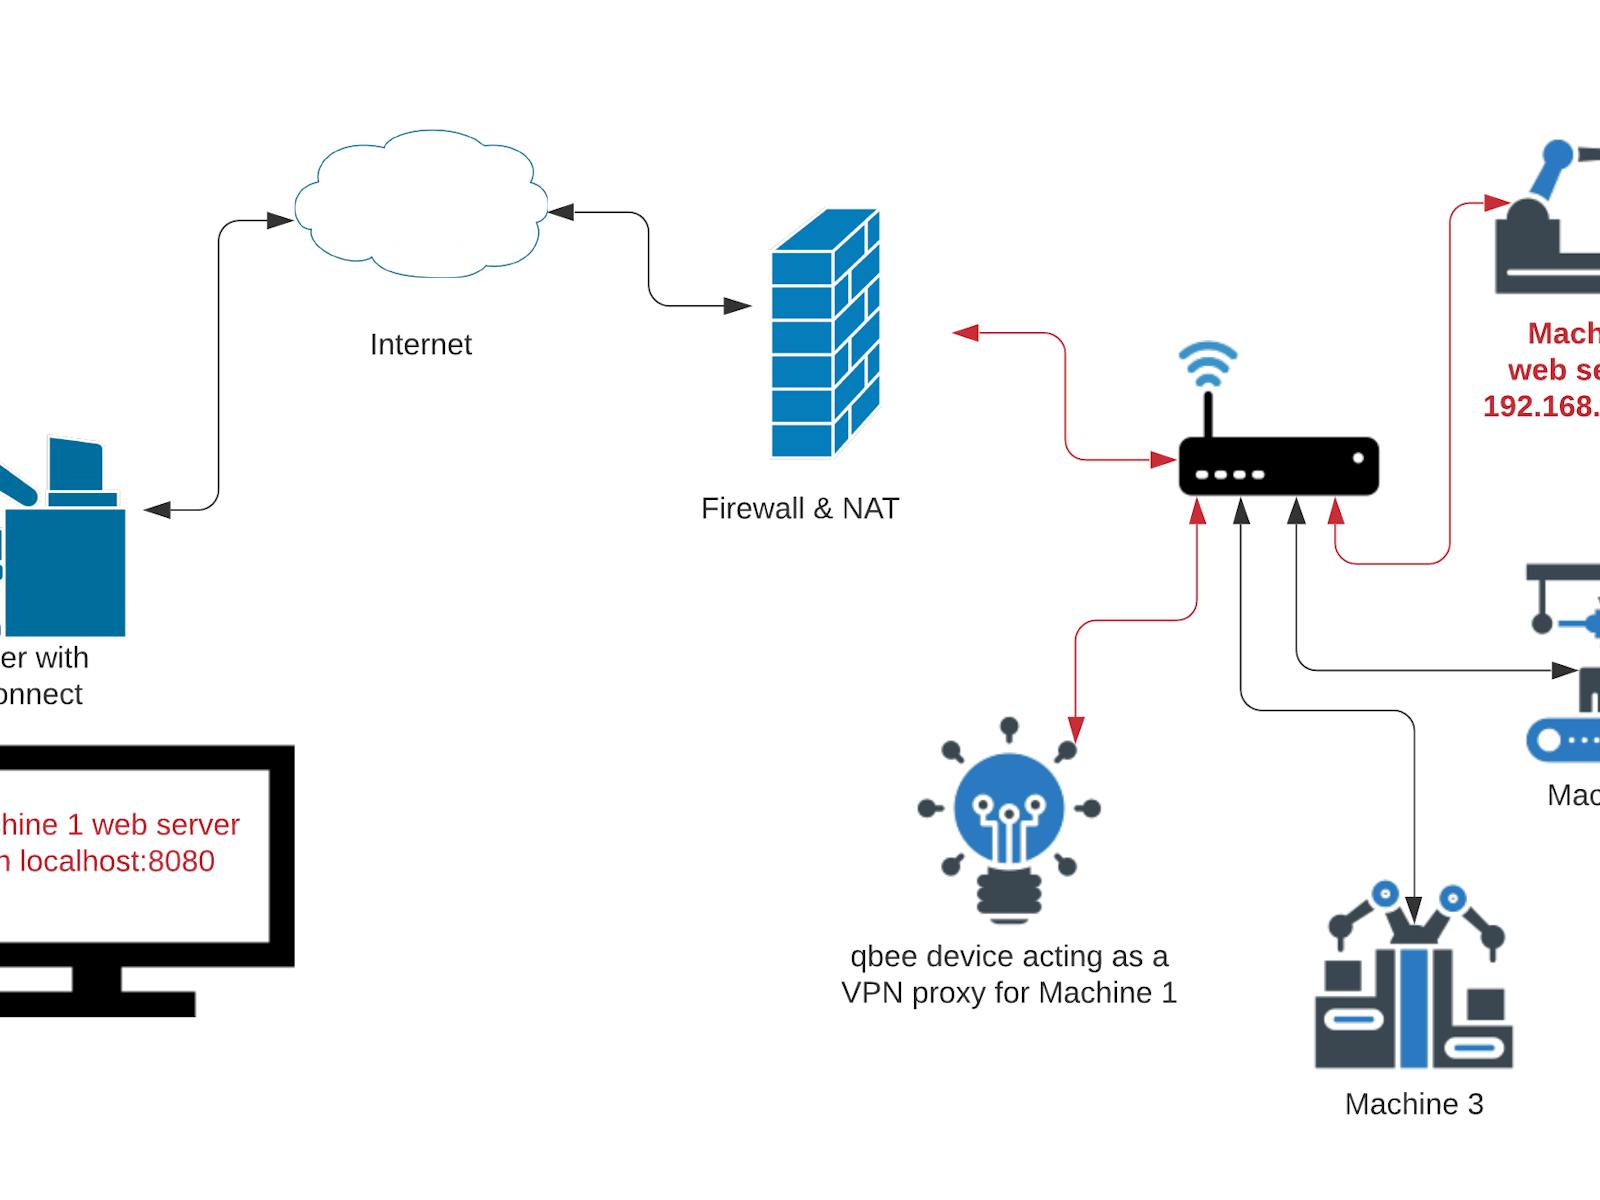
Firewalls and port forwarding play a crucial role in determining how external devices can communicate with your Raspberry Pi. A firewall acts as a barrier between your local network and the internet, blocking unauthorized access while allowing legitimate traffic. However, this protection can also prevent incoming SSH connections unless specific rules are configured. Port forwarding, on the other hand, directs incoming traffic from a specific port on your router to your Raspberry Pi's local IP address.
When setting up SSH to Raspberry Pi behind firewall port forwarding, you need to ensure that the router allows traffic on the designated SSH port (default is 22). Without proper port forwarding, external devices attempting to connect to your Pi will be blocked by the firewall. This setup is essential for enabling remote access while maintaining network security. By carefully configuring these settings, you can strike a balance between accessibility and protection.
It's also worth noting that misconfigured port forwarding can expose your Raspberry Pi to potential threats. For example, leaving the default SSH port open without additional security measures can make your device a target for brute-force attacks. Therefore, understanding the interplay between firewalls, port forwarding, and SSH is critical for creating a secure and functional remote access setup.
Read also:Who Is Gunther Eagleman Discover The Inspiring Journey Of A Visionary Leader
Step-by-Step Guide to Configure SSH on Raspberry Pi
Enabling SSH on Your Raspberry Pi
Before you can configure port forwarding, you need to enable SSH on your Raspberry Pi. This process is straightforward and can be completed in a few simple steps:
- Connect your Raspberry Pi to a monitor, keyboard, and mouse, or access it via a local network.
- Open the terminal and type
sudo raspi-configto launch the configuration tool. - Navigate to "Interfacing Options" and select "SSH."
- Choose "Yes" to enable SSH and exit the tool.
Alternatively, you can create an empty file named ssh in the boot directory of your Raspberry Pi's SD card. This method is particularly useful if you're setting up the Pi headlessly (without a monitor).
Configuring Port Forwarding on Your Router
Once SSH is enabled, the next step is to configure port forwarding on your router. Here's how:
- Access your router's admin panel by entering its IP address (e.g., 192.168.1.1) in a web browser.
- Log in with your admin credentials and navigate to the port forwarding section (this may be labeled as "NAT," "Virtual Server," or similar).
- Create a new rule to forward external traffic on port 22 (or a custom port) to your Raspberry Pi's local IP address.
- Save the changes and restart your router if necessary.
After completing these steps, your Raspberry Pi should be accessible via SSH from external networks. Be sure to note your public IP address, as you'll need it to connect remotely.
What Are the Common Challenges with SSH and How to Overcome Them?
While SSH is a powerful tool, users often encounter challenges when setting it up, especially in restrictive network environments. One common issue is dynamic IP addresses, which can change periodically and disrupt remote access. To address this, consider using a Dynamic DNS (DDNS) service to assign a consistent hostname to your public IP address.
Another challenge is ensuring security while enabling remote access. Default SSH configurations can be vulnerable to brute-force attacks. To mitigate this risk, change the default SSH port from 22 to a non-standard port and disable password authentication in favor of key-based authentication. Additionally, use tools like Fail2Ban to monitor and block suspicious login attempts.
Finally, some users may face difficulties due to ISP restrictions or NAT configurations. In such cases, alternative methods like reverse SSH tunnels or third-party services (e.g., ngrok) can provide a workaround. By understanding these challenges and implementing appropriate solutions, you can ensure a smooth and secure SSH experience.
Is It Possible to Secure SSH Connections Further?
Absolutely! Securing SSH connections is a critical step in protecting your Raspberry Pi from unauthorized access. One effective method is to use key-based authentication, which replaces passwords with cryptographic keys. This approach not only enhances security but also simplifies the login process for trusted devices.
Another way to bolster security is by implementing a firewall on your Raspberry Pi itself. Tools like UFW (Uncomplicated Firewall) allow you to restrict access to specific IP addresses or networks, reducing the risk of unauthorized connections. Additionally, regularly updating your Pi's operating system and SSH software ensures that you're protected against known vulnerabilities.
For advanced users, consider using two-factor authentication (2FA) for SSH logins. This adds an extra layer of protection by requiring a second form of verification, such as a code sent to your phone. By combining these techniques, you can create a highly secure SSH setup that safeguards your Raspberry Pi from potential threats.
How Can You Test Your SSH Connection?
Testing your SSH connection is an essential step to ensure everything is configured correctly. Start by attempting to connect to your Raspberry Pi from an external network using the following command:
ssh pi@your-public-ip-address -p your-port-numberIf the connection is successful, you'll be prompted to enter your password or authenticate using your SSH key. If you encounter issues, verify that port forwarding is correctly configured and that your firewall allows traffic on the specified port.
Another useful tool for testing is ssh -v, which provides verbose output to help diagnose connection problems. Additionally, you can use online port-checking services to confirm that your router is forwarding traffic as expected. By systematically testing each component, you can identify and resolve any issues with your SSH setup.
What Are the Alternatives to Port Forwarding for SSH?
While port forwarding is a common solution for enabling SSH access, it's not the only option. Reverse SSH tunnels, for example, allow your Raspberry Pi to initiate a connection to an external server, which then acts as an intermediary for incoming traffic. This method bypasses the need for port forwarding and is particularly useful in restrictive network environments.
Another alternative is using third-party services like ngrok or PageKite. These tools create secure tunnels to your Raspberry Pi without requiring changes to your router's configuration. While convenient, they may introduce additional costs or limitations depending on the service plan.
Finally, consider using a virtual private network (VPN) to securely access your local network. A VPN encrypts all traffic between your device and the network, eliminating the need for port forwarding. Each of these alternatives has its own advantages and trade-offs, so choose the one that best suits your needs.
Frequently Asked Questions
How Do I Find My Raspberry Pi's Local IP Address?
To find your Raspberry Pi's local IP address, open the terminal and type hostname -I. This command will display the IP address assigned to your Pi on the local network.
What Should I Do If My Public IP Address Changes Frequently?
If your public IP address changes frequently, consider using a Dynamic DNS (DDNS) service. These services assign a consistent hostname to your IP address, ensuring uninterrupted remote access.
Can I Use a Custom Port for SSH Instead of Port 22?
Yes, you can configure SSH to use a custom port by editing the sshd_config file on your Raspberry Pi. Simply change the "Port" setting to your desired value and restart the SSH service.
In conclusion, setting up SSH to Raspberry Pi behind firewall port forwarding is a valuable skill that enhances your ability to manage devices remotely. By following the steps outlined in this guide, you can create a secure and functional setup that meets your needs. Whether you're a beginner or an experienced user, mastering this process will empower you to take full advantage of your Raspberry Pi's capabilities.
Meta Description: Learn how to configure SSH to Raspberry Pi behind firewall port forwarding with this step-by-step guide. Secure remote access and overcome common challenges today!
Is Kristi Mclelland Married? Discover The Truth About Her Personal Life
Best Remote SSH IoT Platform Free Android: A Comprehensive Guide
Discover The Best SSH IoT Anywhere: Secure Connectivity For Your Devices
Ssh port forwarding for remote device access behind firewall Hackster.io

Raspberry Pi Router Firewall Low Orbit Flux
